20 Mar 2014
RAIDs Explained
RAID stands for Redundant Array of Inexpensive (Independent) Disks.
On most situations you will be using one of the following four levels of RAIDs.
- RAID 0
- RAID 1
- RAID 5
- RAID 10 (also known as RAID 1+0)
This article explains the main difference between these raid levels along with an easy to understand diagram.
In all the diagrams mentioned below:
- A, B, C, D, E and F – represents blocks
- p1, p2, and p3 – represents parity
RAID LEVEL 0
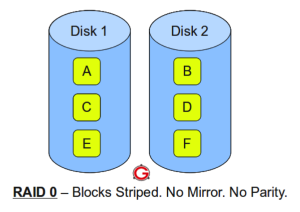
Following are the key points to remember for RAID level 0.
- Minimum 2 disks.
- Excellent performance ( as blocks are striped ).
- No redundancy ( no mirror, no parity ).
- Don’t use this for any critical system.
RAID LEVEL 1
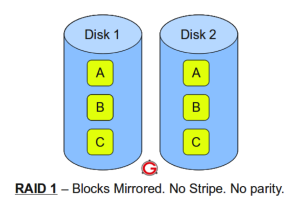
Following are the key points to remember for RAID level 1.
- Minimum 2 disks.
- Good performance ( no striping. no parity ).
- Excellent redundancy ( as blocks are mirrored ).
RAID LEVEL 5
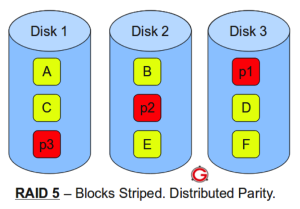
Following are the key points to remember for RAID level 5.
- Minimum 3 disks.
- Good performance ( as blocks are striped ).
- Good redundancy ( distributed parity ).
- Best cost effective option providing both performance and redundancy. Use this for DB that is heavily read oriented. Write operations will be slow.
RAID LEVEL 10
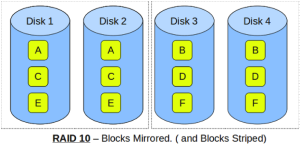
Following are the key points to remember for RAID level 10.
- Minimum of 4 disks.
- Also called as Stripe of mirrors
- Excellent redundancy ( as blocks are mirrored )
- Excellent performance ( as blocks are striped )
- Really good choice for mission critical applications like Databases , but is very costly
wowwwwwwwwwwwww……………super explanation master